Categories
Hardware

High Quality Camera for Raspberry Pi

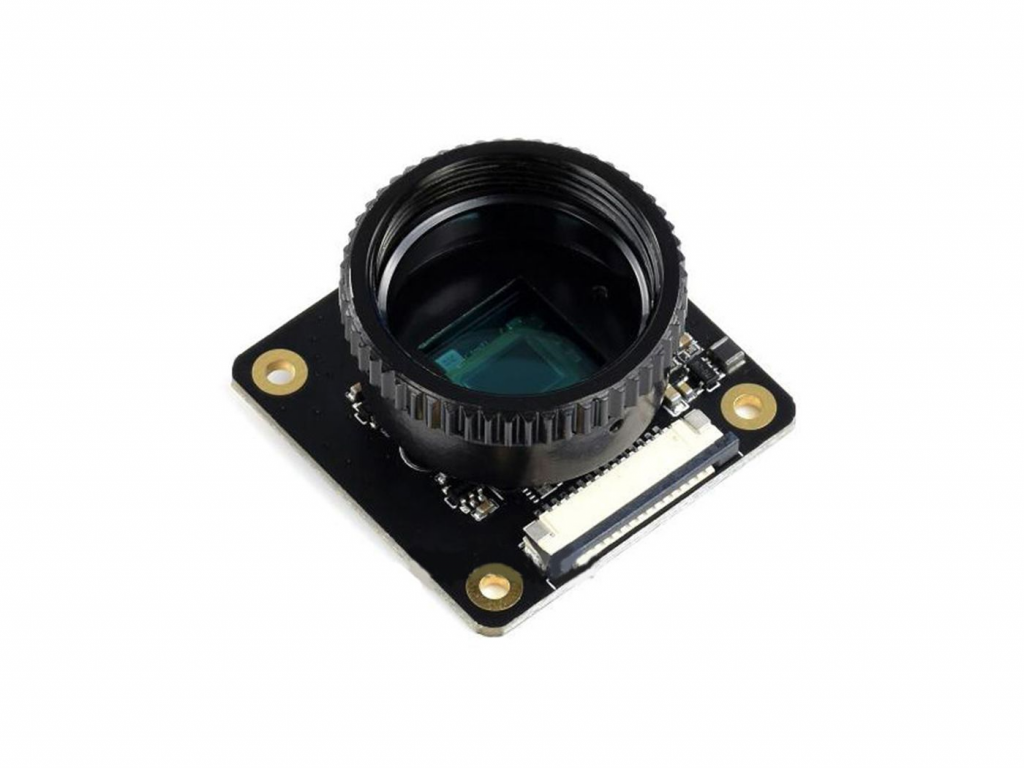
This high-quality camera is equipped with an IMX477 12.3MP high quality camera module which adopts the IMX477R sensor. It supports CS-mount lenses by default, but however, a C-CS adapter is included in order to use C mount lenses as well with this camera. It is compatible with Raspberry Pi Compute Module 3, 3 Lite, 3+, 3+ Lite, and NVIDIA Jetson Nano. This offers a higher resolution (12.3MP) and higher sensitivity (nearly 50% greater area per pixel for improved low-light performance) than the traditional 8MP IMX219 cameras.

  • Sony IMX477 sensor with 12.3MP for high resolution 
  • Greater pixel area for improved low-light performance
  • Back-illuminated sensor architecture for improved sensitivity
  • Supports a wide range of C and CS-mount lenses
  • Integrated back-focus adjustment ring

More information:
https://www.seeedstudio.com/High-Quality-Camera-For-Raspberry-Pi-Compute-Module-Jetson-Nano-p-4729.html

Categories
Hardware Tutorial

Raspberry Pi health monitoring

This tutorial will show you how to use IoT Guru Cloud to monitor the health of your Raspberry Pi and alert you when something is wrong.

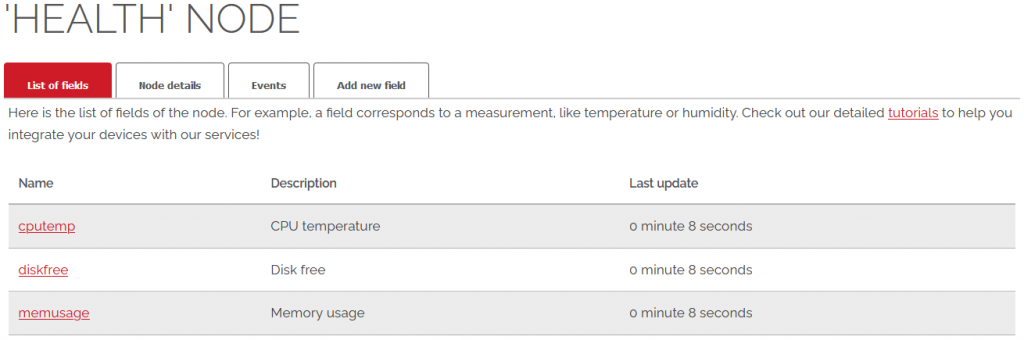
At the end of this tutorial, you will run a Python script every five minutes using crontab to send your Raspberry Pi’s temperature, free disk space and memory usage to the cloud using our REST API.

Step 1

First of all, we suggest to read our basic tutorials about devices, nodes and fields:

Step 2

Create a device of your Raspberry Pi, create a node of this device, and name it as ‘Health’, and create three fields like this:

Step 3

Copy the node key of the ‘Health’ node (by click ‘Show the key’ button).

Step 4

Create a raspi_health.py file with your favorite editor and copy-paste this code below. Don’t forget to replace the nodeKey value with your node key!

import os
import ssl
import re
import subprocess
import urllib.request

# Replace with your nodeKey:
nodeKey = 'meg1rJ98goXrS7QnAcBMfw'

# DO NOT EDIT BELOW, unless you trust yourself

cpu_temp_endpoint  = 'https://api.iotguru.cloud/measurement/create/' + nodeKey + '/cputemp/'
disk_free_endpoint = 'https://api.iotguru.cloud/measurement/create/' + nodeKey + '/diskfree/'
mem_usage_endpoint = 'https://api.iotguru.cloud/measurement/create/' + nodeKey + '/memusage/'

#!/usr/bin/env python3

def getRAMinfo():
    p = os.popen('free')
    i = 0
    while 1:
        i = i + 1
        line = p.readline()
        if i==2:
            RAM_stats = line.split()[1:4]
            RAM_total = int(RAM_stats[0])
            RAM_free = int(RAM_stats[2])
            RAM_freeperc = int(RAM_free / RAM_total * 100)
            return RAM_freeperc

def postData(endpoint, value):
    gcontext = ssl.SSLContext()
    url = endpoint + str(value)
    req = urllib.request.Request(url)
    resp = urllib.request.urlopen(req, context=gcontext)
    respData = resp.read()
    print(respData)

cputemp = subprocess.Popen('cat /sys/class/thermal/thermal_zone0/temp', shell=True, stdout=subprocess.PIPE).stdout.read().decode('utf-8')
cputemp = int(int(cputemp) / 1000)
postData(cpu_temp_endpoint, cputemp)

usedspace = subprocess.Popen('df --output=pcent / | awk -F\'%\' \'NR==2{print $1}\'', shell=True, stdout=subprocess.PIPE).stdout.read().decode('utf-8')
freespace = 100 - int(usedspace)
postData(disk_free_endpoint, freespace)

freeram = getRAMinfo()
postData(mem_usage_endpoint, freeram)

Step 5

Test the script in the command line, you will get something like this:

> python3 raspi_health.py
b'{"epoch":18567,"nodeId":"f1cf3da0-1c34-11eb-be3c-3f829e309568","nodeShortId":"vjw_gp4wlWjxzz2gHDQR6w","field":"cputemp","created":"4eb38920-1c37-11eb-be3c-3f829e309568","floatValue":32.0,"textValue":null}'
b'{"epoch":18567,"nodeId":"f1cf3da0-1c34-11eb-be3c-3f829e309568","nodeShortId":"vjw_gp4wlWjxzz2gHDQR6w","field":"diskfree","created":"4ed9d5d0-1c37-11eb-b075-c16b57e52174","floatValue":16.0,"textValue":null}'
b'{"epoch":18567,"nodeId":"f1cf3da0-1c34-11eb-be3c-3f829e309568","nodeShortId":"vjw_gp4wlWjxzz2gHDQR6w","field":"memusage","created":"4f113980-1c37-11eb-be3c-3f829e309568","floatValue":44.0,"textValue":null}'

Step 6

Add the script to the end of your crontab, by using the crontab -e command:

*/5 * * * * python3 /home/pi/raspi_health.py > /dev/null 2>&1

Step 7

Check out the chart of one of your field:

That’s all, folks, enjoy your charts of your Raspberry Pi. 🙂

Based on Jasonb’s forum post: tutorial-monitor-health-of-your-raspberry-pi

Thank you, Jason! 🙂

Categories
Hardware

Raspberry Pi Compute Module 4 IO Board

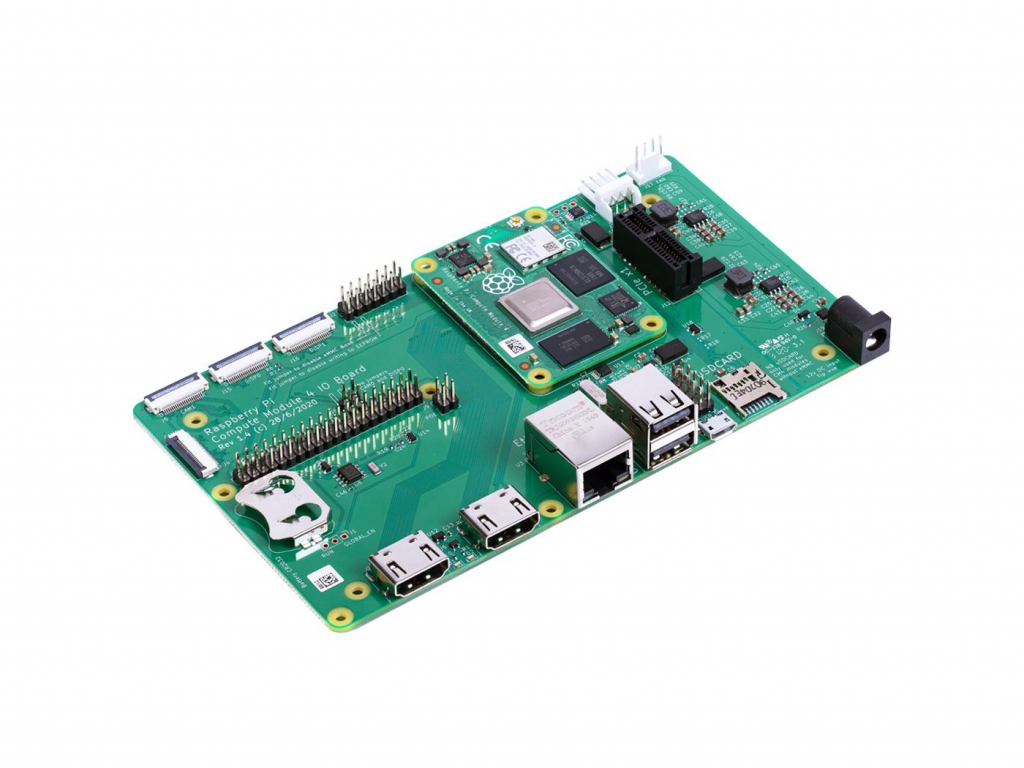
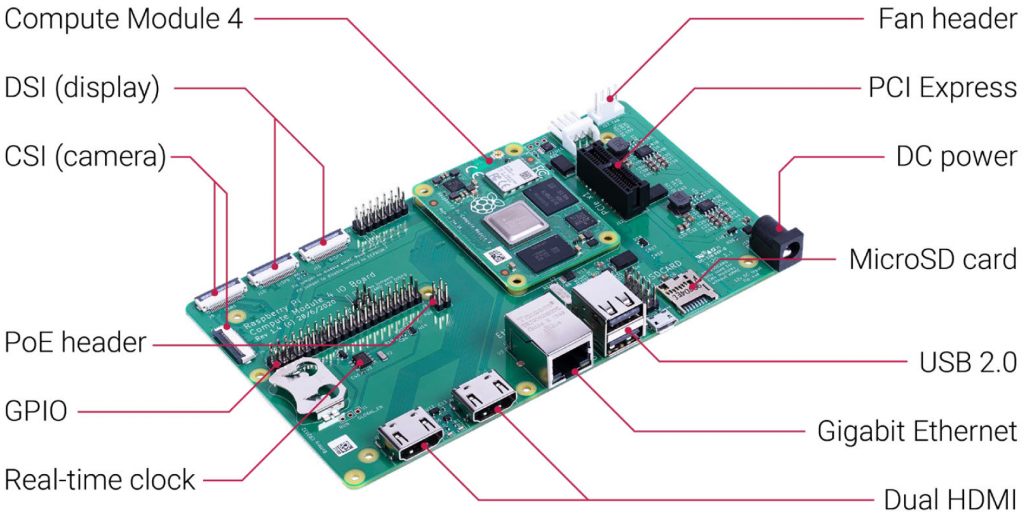
Exposing every interface from Raspberry Pi Compute Module 4, the Compute Module 4 IO Board provides a development platform and reference base-board design.

  • External power connector (+12V, +5V)
  • 2 x full-size HDMI 2.0 connectors
  • 2 x USB 2.0 connectors, with header for two additional connectors
  • Gigabit Ethernet RJ45 with PoE support
  • Micro USB socket for updating Compute Module 4
  • MicroSD card socket for Compute Module 4 Lite (without eMMC) variants
  • PCIe Gen 2 x1 socket
  • Standard fan connector
  • 2 x MIPI DSI display FPC connectors (22-pin 0.5 mm pitch cable)
  • 2 x MIPI CSI-2 camera FPC connectors (22-pin 0.5 mm pitch cable)
  • Standard Raspberry Pi HAT connectors
  • Real-time clock with battery socket and ability to wake Compute Module 4
  • Various jumpers to disable specific features, e.g. wireless connectivity, EEPROM writing

More information:
https://www.raspberrypi.org/products/compute-module-4-io-board/

Categories
Hardware

Seeeduino XIAO

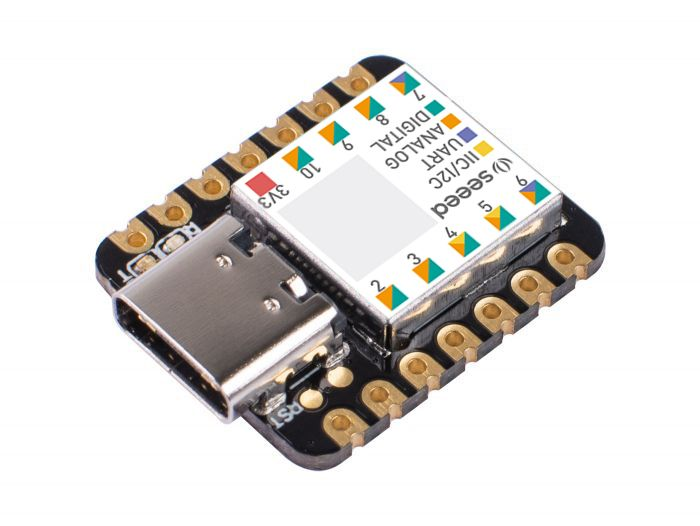
Seeeduino XIAO is the smallest Arduino compatible board in Seeeduino Family. It is an Arduino microcontroller that is embedded with the SAMD21 microchip. The interfaces of Seeeduino XIAO is rich enough in such a tiny Dev. Board as well.

  • Powerful CPU: ARM® Cortex®-M0+ 32bit 48MHz microcontroller(SAMD21G18) with 256KB Flash,32KB SRAM
  • Flexible compatibility: Compatible with Arduino IDE
  • Easy project operation: Breadboard-friendly
  • Small size: As small as a thumb(20×17.5mm) for wearable devices and small projects.
  • Multiple development interfaces: 11 digital/analog pins, 10 PWM Pins, 1 DAC output, 1 SWD Bonding pad interface, 1 I2C interface, 1 UART interface, 1 SPI interface.

More information:
https://www.seeedstudio.com/Seeeduino-XIAO-Arduino-Microcontroller-SAMD21-Cortex-M0+-p-4426.html

Categories
Hardware

Raspberry Pi Compute Module 4

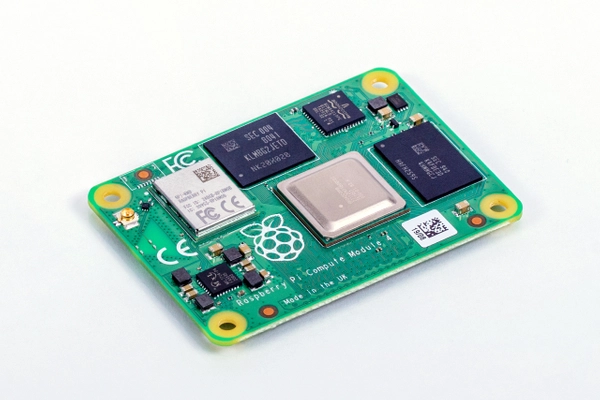
The power of Raspberry Pi 4 in a compact form factor for deeply embedded applications. Raspberry Pi Compute Module 4 incorporates a quad-core ARM Cortex-A72 processor, dual video output, and a wide selection of other interfaces. Available in 32 variants, with a range of RAM and eMMC Flash options, and with or without wireless connectivity.

  • Broadcom BCM2711 quad-core Cortex-A72 (ARM v8) 64-bit SoC @ 1.5GHz
  • H.265 (HEVC) (up to 4Kp60 decode), H.264 (up to 1080p60 decode, 1080p30 encode) 
  • OpenGL ES 3.0 graphics
  • Options for 1GB, 2GB, 4GB or 8GB LPDDR4-3200 SDRAM (depending on variant)
  • Options for 0GB (“Lite”), 8GB, 16GB or 32GB eMMC Flash memory (depending on variant)
  • Option for fully certified radio module:
    2.4 GHz, 5.0 GHz IEEE 802.11 b/g/n/ac wireless;
    Bluetooth 5.0, BLE; On-board electronic switch to select either external or PCB trace antenna

More information:
https://www.raspberrypi.org/products/compute-module-4/